Top 5 walks in the North East of England

If you’re a keen walker or just out for a ramble, then look no further than these beautiful places to go in the North East sent to us by the keen walkers at Status Digital in Newcastle.

Hadrian’s Wall

You can walk the entire length of Hadrian’s Wall along the 84 mile National Trail – however, there are many shorter routes that allow you to enjoy a sample of Hadrian’s Wall in a day. One of the best sections can be walked from Steel Rigg in a circular route up to Hotbank Farm then back along the wall and two of its milecastles.

Hadrians Wall

Hadrians Wall

You may well recognise many of the views as this is one of the most photographed stretch of the wall – including Crag Lough and the Sycamore Gap (famous from Robin Hood Prince of Thieves!) – so be sure to take your camera.
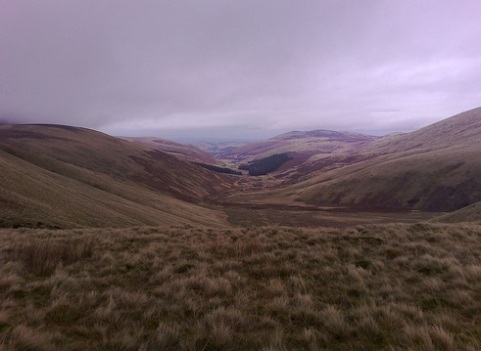
Image

College Valley

Northumberland Coast

Blow the cobwebs away with a walk up the Northumberland Coast for stunning coastline and beautiful castles. Walking from Craster down to Howick Hall and back up the coast is a fairly flat route, and combines farmland on the way down with rugged coastline on the way back up. There’s even a secluded little beach about half way round which is perfect for a lunch stop. If you fancy a drink afterwards head up to The Ship at Low Newton by the Sea slightly further up the coast. Their beer is brewed in a microbrewery just next to the pub.

Image

Swaledale

This varied walk sums up all the fabulous things Swaledale has to offer – valley greenery, steep hillsides, and moor tops together with the lead mining history which has shaped the landscape so dramatically. Set off from the village of Gunnerside up Gunnerside Ghyll, starting along the river then gradually making your way higher up the valley.

Swaledale

Swaledale

Scramble up Bunton Hush, a remnant of an old lead mining practice, then stride over the moor tops. The route comes down past Old Gang Smelt Mill, over Surrender Bridge before looping back round to Gunnerside. Classic Swaledale.

Collage Valley

Collage Valley

Durham Dales

This area is great for a real feeling of being away from it all. It’s very quiet and peaceful and seems virtually untrodden in places, so much so that you might find yourself relying on a map and compass on occasion. A favourite is walking from Rookhope near Stanhope, finding your way across the expansive moorland, exploring the old mining sites and ending up at The Rookhope Inn for an ale and a pie.

Craster Walk

Craster Walk

The Cheviot

The jewel of Northumberland, this 2,674 ft (815 m) high, flat-topped mound can be reached via several stunning routes through the Cheviot Hills. Most notably College Valley, for it’s very picturesque, typically Northumbrian landscape. There are a number of routes to the summit, varying in gradient but the top of the hill is virtually flat for quite a long way before you reach the summit. Depending on the weather, this tends to mean the top is mostly occupied by fairly a treacherous peat bog, but there are some good stone paths through most of it.

The Cheviot

The Cheviot

Wisdom Wednesday on Camping

Last week’s Wisdom Wednesday focused on asking our expert Via Facebook and Twitter all about Camping.

Here are all the questions and answers!
BjRacingTeam on Twitter- What is the best way of removing mud from a poly cotton tent? (outwell indian lake teepee)

GO Activities – Wait for a sunny day, pitch the tent and clean it with warm water and a big sponge, use Fabsil or Nikwax Tech Wash for stains etc, wash it downwards so cleaning product doesn’t stay in the fabric, then rinse with clean water, then leave it to dry in the sun, then re-proof it!

BjRacingTeam on Twitter -What are the best tent pegs for muddy conditions?

GO Activities- This Ripple Angle Peg or these Power Pegs are better for mud, there are no ‘perfect’ pegs for mud though so just get the best you can afford and come prepared!
NellBridges on Twitter  “Is there a list of campsites with disabled facilities? And details?”

GO Activities – I recommend using the facilities section on Camping Ninja or here on UK campsite. 
 Talodi on Twitter  When camping in Europe what are my essentials? 

GO Activities-  Over and above what you would usually take camping I would recommend a 12v pin adaptor, and for your gas stove take more gas than usual or invest in a multi fuel stove like the MSR as screw in gas bottles can be difficult to find.  – Here is a book for the best campsites in Europe too which could be handy! If you are planning to wild camp there is a guardian article that is very handy. Also- in Northern Europe don’t forget to watch out for Tics which carry Lime’s disease. Red rings around a bite indicate a stop at the doctor should be immediate!”

PurpleMadboy via Twitter -What should I pack for the WHW (West Highland Way)?

GO Activities – Lightweight is key! First off we would suggest a 50+15 rucksack for the week (this route should take a week or so.)
Stock up on extra food en route but pack plenty of emergency rations (dehydrated food just in case) – utensils, and all the right clothes for the climate and time you are going.

Take good boots obviously, Something like a Scarpa SL , and a sleep mat for the evenings.

Don’t over pack, so go for clothes, double up on socks and buy good quality ones that are thick enough for comfort. Boots, cooking gear, sleeping gear ( depends on time of year but make sure you pack the right season sleeping bag) and emergency items as well.
We sell this activity so for a full kit list go here!

This is our most popular itinerary as it fits in perfectly to a weeks holiday in the WHW.

To get your questions answered weekly, like us or follow us on Facebook as well as Twitter. 

Wisdom Wednesday – Biking Q and A

Every Wednesday we take to Twitter and Facebook to get your questions answered on a weekly topic. Here are the Questions and Answers on- BIKING.

Ross Butterworth- How do I get my bike abroad?.. (Self made biking holiday!)

GO Activities- “Most airlines have an add on charge for bring sports equipment, look into this with your airline and make a note of the weight and the weight of your bike. Once you have this either buy a designed bike carry case or pop into your local bike shop/dept and ask for an old bike box, then disassemble your bike to fit in this box. Make sure its padded and protected sufficiently as it may get damaged otherwise.

I also put in my pads/body armour/cycle clothing in to pad out the bike! Have a great time!”

DirtBike13 from Twitter- “What’s the best way to stop disc brake squeal?”

GO Activities -“You need to make sure the pads and Rotor are not contaminated, use some car/motorbike disc brake cleaner on the pads (remove from calliper) and the rotor, wipe with a clean lint free rag/cloth and repeat a couple of times allowing time to dry between. The pads may have “glazed” so use some 220-grit sand paper to rough up the surface, do this also on the braking surface of the rotor (its easiest to remove the rotor from the wheel for this).

Once this is all done and reassembled onto the bike you need to “bed” the brakes in – this is where the pad leaves a small trace of the compound on the rotor enabling it grip and slow better. To do this you need to ride the bike around 20mph and slow the bike down using the brake you are bedding in to a complete stop as fast as you can without skidding (be careful not to crash etc) this needs to be done around 15-20 times.

Squeaking should stop!”

Ross Butterworth -Can I easily upgrade my deore hydraulic disc brakes so that they have bigger discs? … Without spending a fortune!

GO Activities – “Yes you can upgrade your Deore disc brakes, you will need to decide what size disc rotors you want, but make sure your forks and frame will accommodate the size you choose – you can find this info from the fork/bike manufacturer’s website. Then you will also need to buy new brake adapters, these are not very expensive and if you shop around for rotors you can get a good deal – Quad Pulse rotors (which Go sell) are a good option. 🙂 ”

 Twitter from TookieBunten Are fat bikes any good for uk/Scotland?”

GO Activities- “If it’s the Fat bikes I’m think of (Snow bikes), then you could get away with riding these bikes in the UK and Scotland but if there is no snow they would be fun but not easy going, probably best to stick to a “normal” MTB”

Andy Achillis Johnson -Would xt shifters work with SRAM xo mech ?

GO Activities- ” Hi Andy, no Shimano XT shifters will not work with SRAM XO Mechs, SRAM and Shimano have very different shift/cable ratio’s. The Mechs and Shifters will need to be from the same manufacturer but not necessarily from the same group (as long as they are the same speed for example 9speed or 10speed)”

Andy Achillis Johnson -What tyres would you recommend for a kenisis maxlight full xt groupset to race on ( 24 hr events )

GO Activities -“Hi Andy, this really depends on the conditions at the race, but as a general rule I would look for a fast rolling tyre that is light weight but does have good sidewall protection against pinch flats as you don’t want to be changing tubes every lap or in the dark. Tyres are a very personal thing so do some online research for the type of characteristics you are looking for.”

Don’t forget to head to our Facebook page or Twitter page to ask your question on a Wednesday.

Tips for New Canoers and Kayakers

Jenny Dennis from GO Outdoors is a keen canoer and kayaker as well as the resident video star of GO Outdoors Online, and someone who regularly heads out to the water.

We asked her to 5 tips for getting started with canoeing or kayaking.


1. Be Safe!

Always wear a buoyancy aid, go out in a group and always tell someone where you’re going. You never know when you might need help.

2. Do your research

You’ll need to find out where you can launch your boat or even IF you can as certain sections of waterways are closed according to the fishing seasons.
You should check the water levels as well, if the area is tidal, you’ll want to time your trip right in order to catch the tides. The same if you’re paddling a river as some parts may be inaccessible if the water levels drop too low.

3. Put everything you’ll need in dry-bags

You never know if you’ll get wet and there’s nothing worse than soggy sandwiches.

4. Take an extra layer

You’ll be working hard so being able to put on an extra layer when stopping for lunch or a cup of tea will keep you nice and toasty and stop you from getting chilled.

5. Have Fun!

To quote a very famous water rat;

“There is nothing – absolutely nothing – half so much worth doing as simply messing about in boats.”

Canoeing or kayaking is great fun, Britain has some of the most spectacular waterways and scenery to accompany them so what better way to explore them then floating along with a few good friends!

The websites I really rate are

http://www.bcu.org.uk/
http://www.canoe-england.org.uk/

To get all the information you need.

Have fun in the water!

Top 5 Essentials for Winter Walking

Winter walking is a wonderful way to get outside and see a different side to nature. But the Winter conditions mean you have to adapt certain things- the kit you carry, where you go and what you wear.

We asked Paul from Paul Poole Mountaineering to give us his top 5 essentials for Winter Walking. The following are just some ideas born out of experience!

1. Plan your day well

There are a couple of things to consider here, firstly the days are shorter and walking on snow and ice can be more tiring than in summer conditions, so initially don’t plan long mountain routes, try smaller peaks or easier routes. Its absolutely essential to consider the weather forecast in the days building up to your day, this allows you to start building a picture of the conditions on the ground. If you’re walking in certain areas of Scotland its advisable to consult the Scottish Avalanche Information Service as well.

Maybe the first few occasions you go out, visit mountains that you already know so you have some familiarity with the area. Consider the use of every piece of kit you carry to reduce the weight, but get the balance correct so you don’t skimp on warm clothing, food, drink and safety kit.

2. Know how to use your ice axe and crampons

Vital bits of kit you don’t leave home without! Ensure they fit correctly when you initially purchase them, its worth taking your boot in to the shop for this. Don’t be shy of wearing them earlier rather than later when it could be very awkward to put them on. Have your axe to hand at all times. At the beginning of each new winter season its worth finding a safe place to practise your self arrest.

3. Get your layering right!

This is a constant battle, but one worth spending the time getting right, don’t worry if you get it wrong a few times. Too many layers and you’ll sweat, which will chill you when you stop and too few layers means you’ll be uncomfortable and won’t enjoy the day as much! Always have a warm synthetic jacket which you can put over all your other layers when you stop for a cuppa.

4. Have more gloves in your bag than you think!

I actually always have two thin pairs, two thicker pairs and in the bottom of my bag, a bombproof pair if mitts! Gloves will always get wet or damp and then your hands chill, which is the time to change them, cold and wet hands are a real worry in a winter environment and really will stop you doing anything.

5. Be Bothered!

Be bothered to change your gloves when they’re damp, be bothered to check the weather forecast, be bothered to change your layers if you’re sweating too much, be bothered to get out into a winter environment and if you do so you won’t be disappointed!

Top 10 Things To Take Canoeing

Whether you want a relaxing day on calm water or an exhilarating white water experience, canoeing or kayaking has something to offer everyone. Canoes are great for families and couples as they can fit two or three people and they can also carry larger loads making them perfect for overnight canoe and camping trips.
Here are our top 10 tips of what you need and should take when you venture onto the water!

1: Pick the right Canoe

The type of canoe you choose depends completely on what type of paddling you wish to do, how many people will be in the boat with you, and what level of paddler you are. General purpose canoes are perfect for people who want to paddle their local lake, pond or quiet river. Though these canoes do not have the performance features of more specialized canoes, their stability and versatility make them the right choice for families and newcomers to the sport of paddling!  Most modern canoes have inherent buoyancy built in during construction; however before venturing onto the water make sure you fasten in extra buoyancy at the ends of the canoe. E.g. airbags or buoyancy blocks. They will help prevent the canoe from completely sinking if swamped or capsized and they also make emptying a water logged canoe much easier.

2: Bring Paddles:

Canoe Paddles can be made from Wood or Aluminium shafts with plastic blades and are single-bladed. An open canoe paddle is measured by kneeling down and holding the paddle upside down just below the blade with the handle on the ground. If your arm is horizontal the paddle is a good length. Everyone knows you can’t canoe without a paddle therefore every canoeist should have one in their hand and an extra paddle with them secured in the canoe in case of an emergency.

3: Take your Buoyancy Aid:

A buoyancy aid should be worn for every canoeing activity; regardless of how well you can swim. It will help keep you afloat should you fall into the water. They fit like a vest and the modern designs ensure they do not restrict movement like old traditional lifejackets. Ensure the buoyancy aid fits correctly and has adequate buoyancy for your size – look for the CE certification mark to show that the buoyancy aid has been subjected to rigorous safety tests. Should you capsize it will keep you afloat and you can easily swim to help yourself. A buoyancy aid is probably the most important piece of safety kit you’ll invest in!

4: Bring a First aid kit:

Just remember whether you kayak, canoe, raft or participate in any other outdoor activities, you should always bring a first aid kit. You can purchase a ready made first aid kit or put one together yourself. Just make sure you check the kit regularly and replace any used or expired supplies. You may also want to take a first aid course so you will know how to use the contents of your kit.

5: Dry bag:

A dry bag is a type of bag which seals in a watertight manner. Using a dry bag will keep your belongings, first aid kit and sensitive equipment dry. Just make sure it is attached inside of the boat! When using one, it is vital to ensure the roll top closure is folded at least three times, to create a watertight seal.
6: Clothing – Get the right stuff!

Wearing and taking the correct clothing when canoeing will make a huge difference to your enjoyment on the water. Paddling in the colder winter months is just as enjoyable as the summer providing you wear the appropriate clothing. We advise customers who are coming canoeing with us to wear and bring the following: Wear warm comfortable clothing. Wool or polyester is ideal. Leave cotton clothing for the pub and no jeans! Wear trainers or boots you don’t mind getting wet (no sandals/flip flops). Bring a Warm hat and gloves, a spare fleece, and always bring Waterproofs (Trousers and Jacket with hood) that are actually waterproof! If you are planning a longer trip on the water, maybe an overnight adventure your kit list will be much longer!

7: Sun cream – you never know! Since you are completely exposed to the elements in canoes, it is always a good idea to bring along some extra sunscreen during the summer months.

8: Drinking water/Food and Snacks – Make sure you take plenty of drinking water – e.g. if you are heading out onto the water for a full day, take at least 2 litres (maybe more if it’s a scorching summers day!). A flask of a hot drink is a must by our books, but not a necessity. Regarding food/snacks, anything in a wrapper that you can stick in your buoyancy aid pocket is good. High energy bars, flapjacks, peanuts that kind of thing. Of course if you are on the water for a full day, take a full packed lunch box too.

9: A Camera. No explanation necessary!

10: Leave no trace – Last but certainly not least. The idea is simple – leave the places you enjoy as good as or better than you found them.

Ben Hatch’s Top Ten Tips For Travelling With Kids

Author Ben Hatch makes my boyfriend hate me, namely when I snort with laughter at his book “Are we nearly there yet” about, as the title says, “A family’s 8000 mile car journey around Britain’.

Going to the Pencil Museum to see the world’s largest pencil, having escapades with teaspoons that shouldn’t be read after a heavy dinner and the romance between married Dinah and Ben will keep you laughing if you love Britain and you love trying new activities. The book was made for us. Not literally. But you can buy it here. You will love it. Promise.

We asked Ben to write us a bespoke article to pass on his advice and hard earned wisdom asking the eternal question besides how socks go missing –

Just how DO you travel with kids? 

Enjoy!

Top Ten Tips For Travelling With Kids

1) Always carry treats. Travelling with children minus treats is like walking through a vampire-infested grave-yard after midnight without a wooden stake. You might survive, but why take the chance.

2) Enthuse your kids about where you’re going. Although never oversell the destination as we did visiting the Wensleydale Cheese Visitor Centre. On the strength of a Yorkshire Tourist Board leaflet featuring Wallace and Gromit sticking their thumbs up, we rashly promised life-size models of the cartoon characters wandering around. The only thing Wallace and Gromit related was a chalk outline of them on the café’s specials board. We’d driven two hours to a working cheese factory to show the kids the processes milling and tipping and for them to learn how Wensleydale cheese did in the last Nantwich International Cheese festival.

3) Not to have a sat-nav today is a bit like being a sailor in the 14th century trying to round the Cape of Good Hope without a nautical chart. It’s insane. Put it this way, if I had a choice – my brakes or the sat-nav? – I’d gladly drill a hole in the driver’s footwell and start using my feet to slow down. Having a sat-nav means brain cells required to remember to turn right or left at particular junctions are more usefully re-directed towards establishing just who in the back was the first to slap the other one round the face with the Corfe Castle activity sheet.

4) Adapt well-known children’s stories into tales involving your children themselves. You can do this by replacing the main character’s name in a classic fairytale with your child’s name so that for us it became, for instance, Phoebe and the Three Bears (‘And then Phoebe tried the medium-sized bowl of porridge…..’) or Hansel and Phoebe (‘And the wicked witch told Phoebe, I will eat your brother be he fat or thin.’). The thrill of an ego-centric toddler hearing themselves thrust into unlikely adventures involving beanstalks, glass slippers and evil witches buys valuable time to continue the argument with your wife about where you went wrong on the A41.

5) In-car Dvd players are a must. They’re available for under £100 but don’t buy the cheapest. We did and it kept disconnecting from the cigarette lighter and returning the film to the beginning. Consequently despite watching Finding Nemo 10 times during our 8,000 mile trip round Britain, our kids are still unaware Nemo was eventually reunited with his father.

6) Colouring-in books and pens provide a welcome distraction. Although be careful – our daughter, protesting about an arduously long drive through the Pennines after a day out at Ostrich World, once employed the toddler equivalent of self-harming with razors. She gothically drew all over her face and arms in black felt tip.

7) Forget I-spy. It’s over in seconds as there’s nothing consistent to see from a speeding car window except the road, others cars and the sky. Instead play I-don’t-Spy, as in ‘I don’t spy with my little eye something beginning with P,’ where the p is then capable of being anything in the known universe unobservable from your car. Our kids once spend two hours guessing the word Gnu.

8) Lie about how far it is. As a rule of thumb under 50 miles is “round the corner.” How far dad? “Round the corner.” Over 50 miles then divide how long it will take to get there by 4. Thus an hour becomes 15 minutes. You must divide by 4 again if this stills meets with disappointment. In fact, repeat this division by 4 until your child says, “It’s round the corner.”

9) Finally, if all else fails, and it will, we suggest turning Classic FM to maximum volume and kidding yourself you aren’t muffling the kids’ din with an even louder one, but that you’re actually educating them about Haydn.

10) Good luck.

Top 5 Places To Bike Ride In The UK

The UK is made for biking. From leisure rides to MTB trails, flat and hilly, there’s something for everyone.

We asked regular biker David Palmer from GO Outdoors what he considers his ‘Top 5’ of biking locations, and how to get into riding.

1) Peak District National Park

Local to GO Activities, there are planty of natural trails in this stunning location. Lots of different trails means there is something for everyone, with all the routes requiring different levels of fitness and technical ability.

2) Penmachno – North Wales

A great purpose-built trail with a natural feel this is a great place to spot wildlife and to enjoy the ride.

3) Kirroughtree – Scotland

Fast and flowing, this is another purpose-built trail that has riders in mind. I really enjoy this route!

4) Coed-y-brenin – Wales

A great trail center offering a number of different trails to ride. The great facilities (cafe, showers, bike shop) also make this great for families and sweaty rides!

5) Glentress – Scotland

Fast and flowing, this is a purpose-built trail with great facilities that means you can easily get sorted afterwards before you head home or onto your next adventure.

The following websites are all fantastic at providing the routes for all types of people as well and I use them regularly to try get the right route for my ability.

Top 5 Things To Wear Biking

We asked the office what to wear biking and we got a response from Mike Sandserson. As you can see from the picture of him below- he knows what to wear when he’s out biking. So here’s his knowledge compacted into a handy top 5!

1. Don’t Wear Cold Cotton!
T-Shirts are great for the post ride beer, but as for riding in a t-shirt in the cold they can be dangerous. Cotton acts as a sponge soaking up sweat, but it does not release it, so your skin and the t-shirt never dries and can ultimately lead to hypothermia. T-shirts will also stop any expensive or technical jacket from working properly.

Instead of a T-shirt wear a breathable layer, there are loads to choose from varying in thickness depending on how cold it is on your ride. The base layer does a great job of wicking speat away from your body and they dry very fast.

2. Mid Layer:
Here you can tailor the jersey to suit the conditions, its main purpose is to work with your base layer and to offer you choice whilst on the ride (too hot- take it off, too cold zip it up etc)

3. Tights and Shorts

Try adding a pair of tights or ¾ length tights under your baggy shorts, this make life so much warmer and keep your calves warmer so less likely to get cramp. On wet days waterproof over shorts or trousers are good bets.

4. Head, feet and hands need care

We all lose a massive amount of heat through our heads, try using a skull cap or a buff under your helmet to help fight this; they also keep your ears warmer!
Winter gloves are a must for cold weather riding, but if your strapped for cash or you’ve forgotten them, try putting a pair of latex work shop gloves under your summer riding gloves, these provide a wind proof and waterproof barrier for your hands (things can get sweaty though). Over shoes will provide and enormous amount of comfort on cold days

5. Waterproof socks!

Great for the cold days, a bit costly – these will be a purchase you won’t forget or regret!

Happy Riding!

10 Tips For Wild Camping

When we asked for advice from the experts- Landscape Treks jumped right in there!

Here are the top ten tips for camping wild!

1) Water water everywhere. You’ll need a fair amount of the stuff from drinking during the day to hydrating or cooking your food and it’s heavy. The good news is you don’t need to carry it all but you do need to think about where you’re going to get it from. All this rain we get means there’s usually loads of water in the hills but not everywhere and all the time. Think about where you might be able to stock up along your route and think about treating it before you drink it if taking from a stream. Boiling is great but needs a fair bit of fuel. Water purifiers are also a great option.

2) Lightweight philosophy. Are you a Mr. Titanium or Mrs Kitchen sink? In the end it’s all down to your personal choice and it’s usually a balance between going as light as possible but still being comfortable.

3) Respect the environment. Avoid big groups and popular spots if at all possible. Always take all your rubbish home and make sure you don’t leave any evidence of your stay.

4) Food for thought. Unless you’re an extreme climber on a big wall route don’t skimp on your food; if you’re on the hills all day you’ll be bound to want to eat more than usual. Saying that, think about what food you’ll be taking as it will have to survive being in your rucksack for a couple of days but be light enough to carry.

5) Shiny new gear. It can be worthwhile investing in some new lightweight camping gear but check it meets your requirements and is fit for the job you want it to do before getting out on the hill. It’s worth spending some time getting to know how to pitch your new tent in your garden in the daylight before you have to do it for real on a dark and windy hill.

6) Location, location, location. Spend some time planning where you might pitch your tent and some alternatives if the sites you choose don’t work out (too boggy, too exposed or maybe just lacking in the view you want). Some of this info you can glean from maps before hand and some you can get from the web.

7) Don’t forget your…..waterproofs, hat and gloves are always a good plan no matter what the weather might look like before you head off. Apart from a lot of your usual day walking gear you’ll need camping kit and a few extra things like hand sanitizer and loo roll….

8) Where to go. No easy way to put this but you’ll need to go to the loo at some point and you need to look after yourself and the environment when you do. That hand sanitizer and loo roll will help you but think about what you’re ‘leaving’ out there. Some people carry it all out, but burying it is a good option if you are careful where and how you do it. Always make sure you bury it at least 30m from any water source.

9) Have fun. Wild camping can be one of the best experiences you can have for very little cost. Waking up in your tent in the mountains with the sun coming up over the horizon can keep you going for weeks on end when you’re back at work. The ultimate getting away from it all package.

10) Get someone else to carry your tent. Give your heavy stuff to your fitter friend to carry or failing that hire a guide.